Build a K3s Cluster on Raspberry Pi
Series: K3s on Raspberry Pi
- Build a K3s Cluster on Raspberry Pi ← this article
- Deploy a Go Service to K3s
- GitOps on K3s with ArgoCD
- Multi-Environment K3s with Kustomize
- Secrets in K3s with Vault and External Secrets Operator
A minimal guide to building a Raspberry Pi K3s cluster. Covers one control-plane node and one or more worker nodes.
Hardware used: Raspberry Pi 4 (4 GB) × 3, SD cards (32 GB+), a network switch, and ethernet cables.
1. Flash SD Cards
OS Lite has no desktop environment, keeping RAM usage low - critical for a node that needs to run workloads. Raspberry Pi Imager lets you pre-configure hostname, SSH, and credentials before first boot so each Pi is ready without a monitor.
Use Raspberry Pi Imager to flash Raspberry Pi OS Lite (64-bit) onto each SD card.
Select the board, OS, and storage drive:
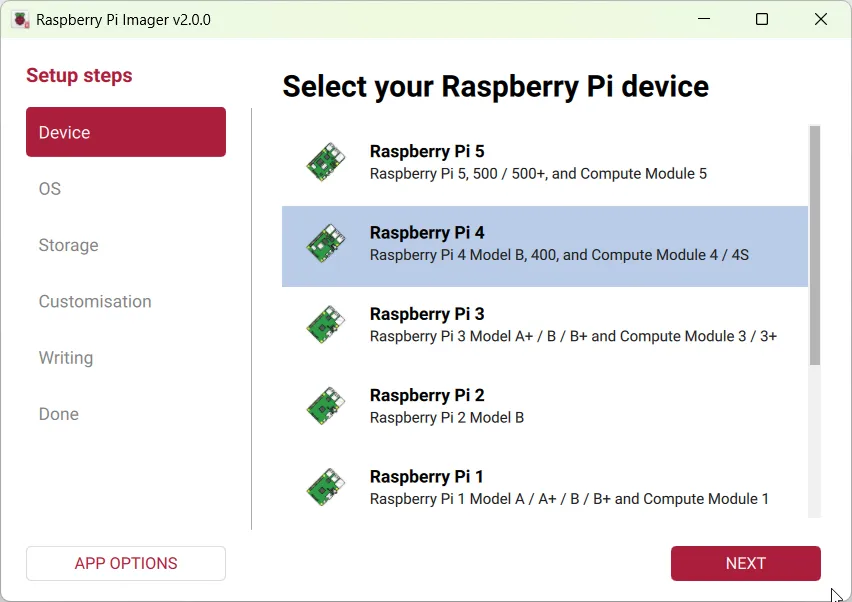
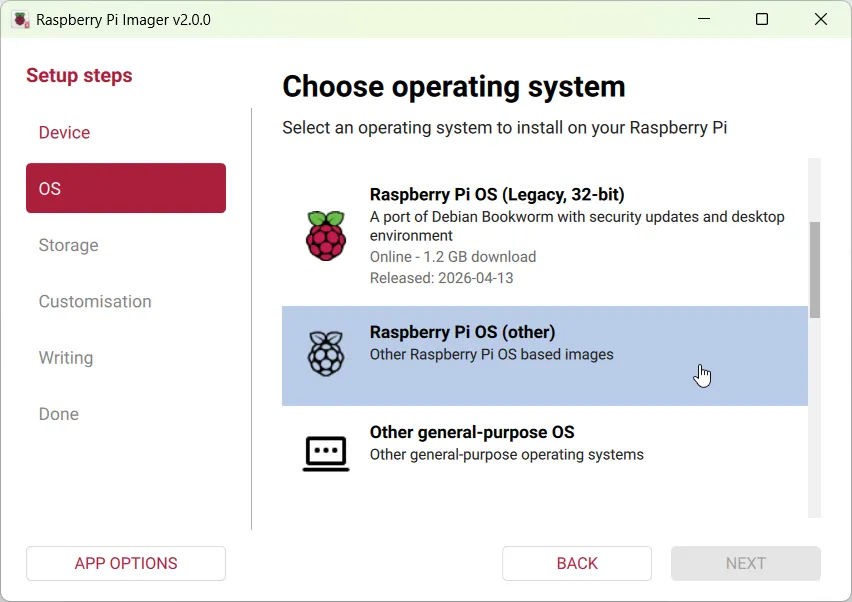
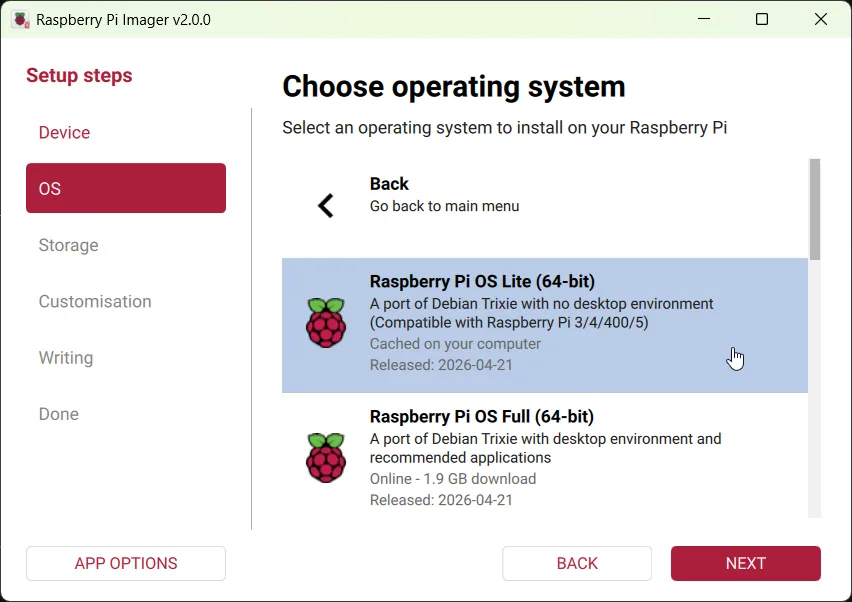
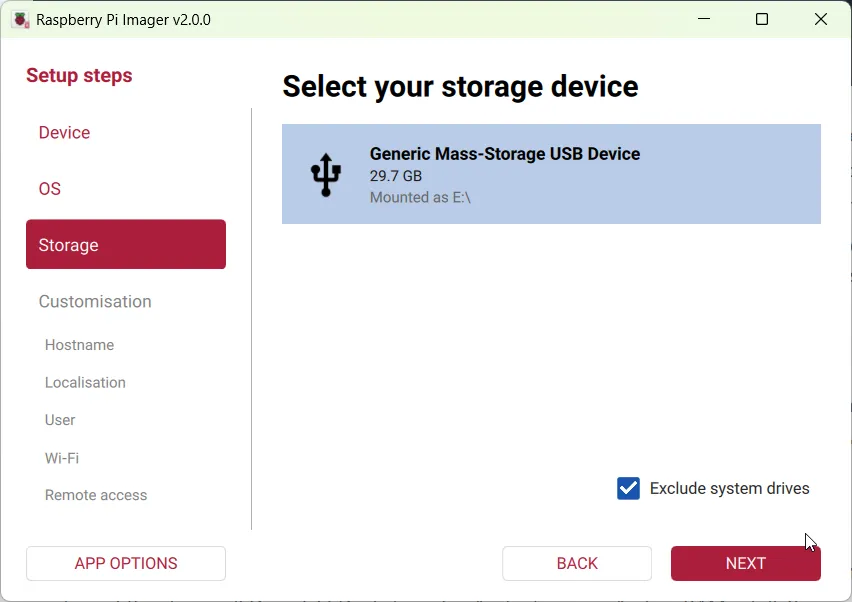
In OS Customisation, configure each node before flashing:
| Setting | Value |
|---|---|
| Hostname | pi01, pi02, pi03 |
| Username / Password | your choice |
| Locale / Timezone | |
| SSH | Enable (password auth) |
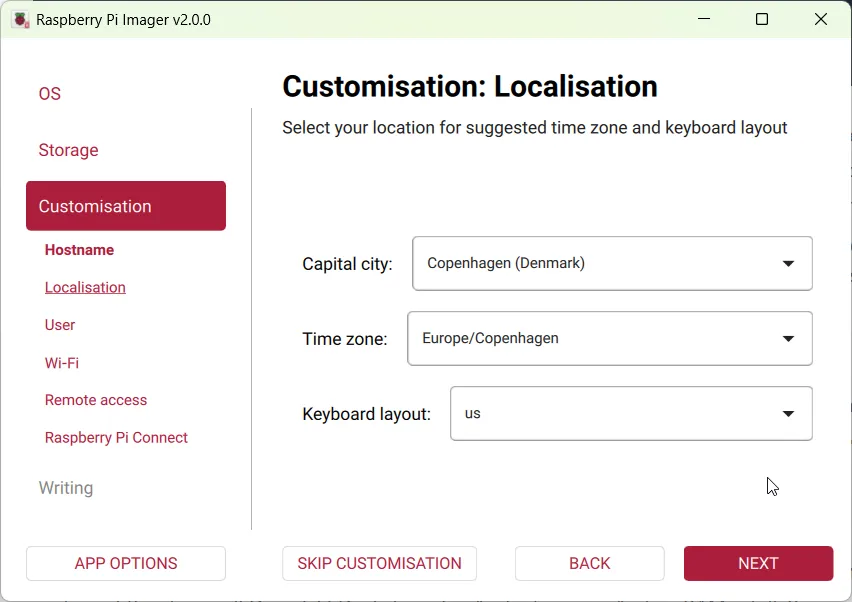
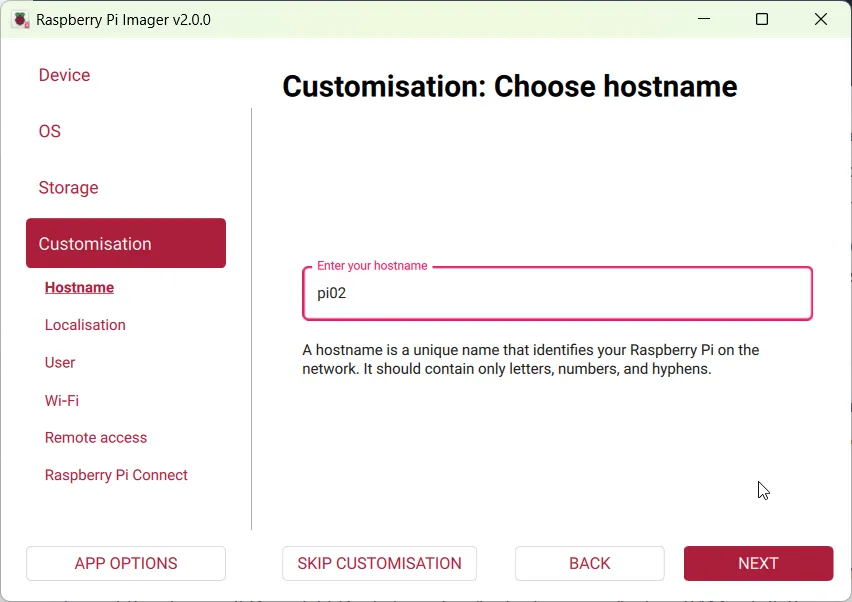
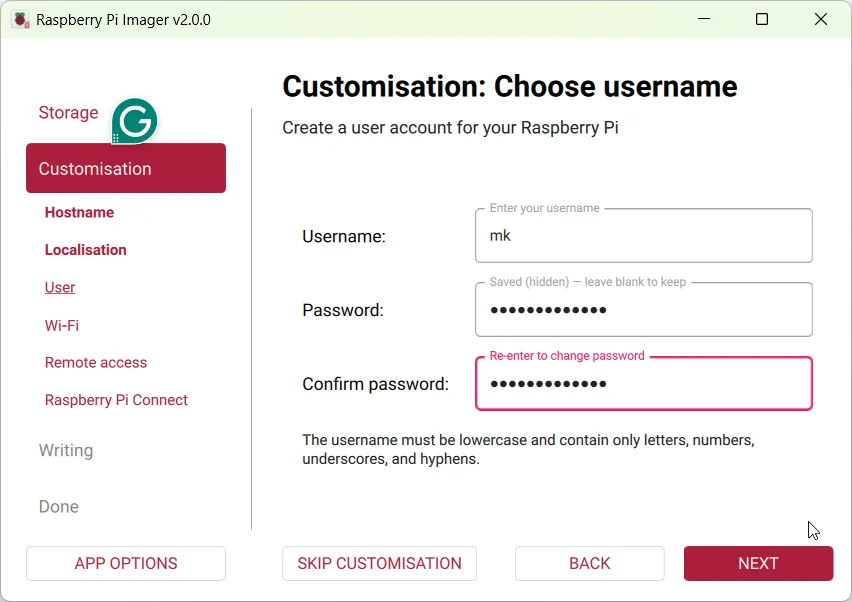
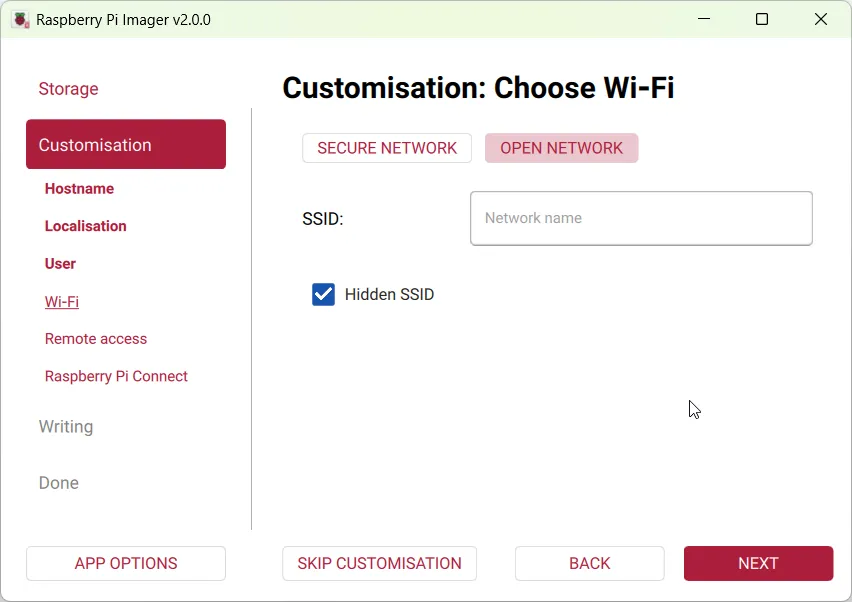
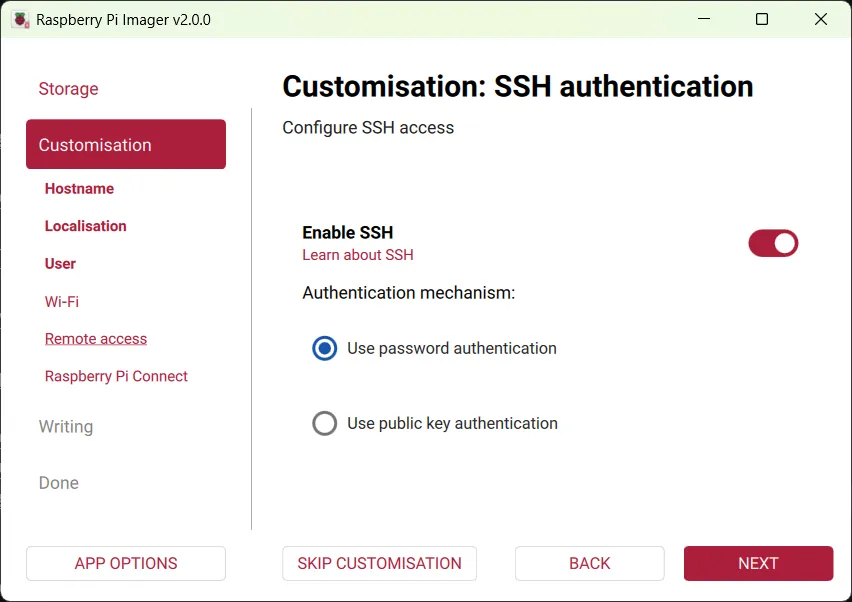
Repeat for every SD card with a different hostname.
2. First Boot & SSH
SSH lets you manage all nodes without a monitor from your laptop. Finding the DHCP-assigned IP first is necessary before setting a static one.
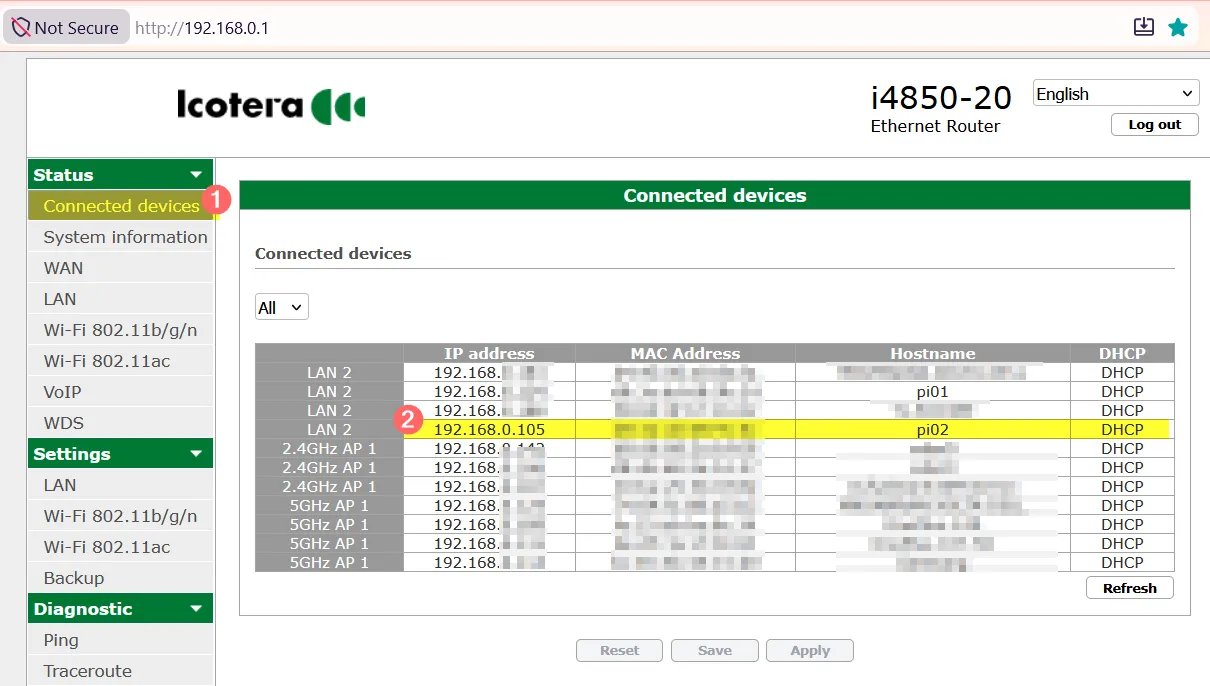
ssh mk@192.168.0.105
Elevate sudo credentials once so subsequent sudo commands don’t prompt:
sudo -v
Update the OS:
sudo apt-get update -y && sudo apt-get upgrade -y && sudo apt-get dist-upgrade -y
sudo apt --fix-broken install -y
3. Set a Static IP
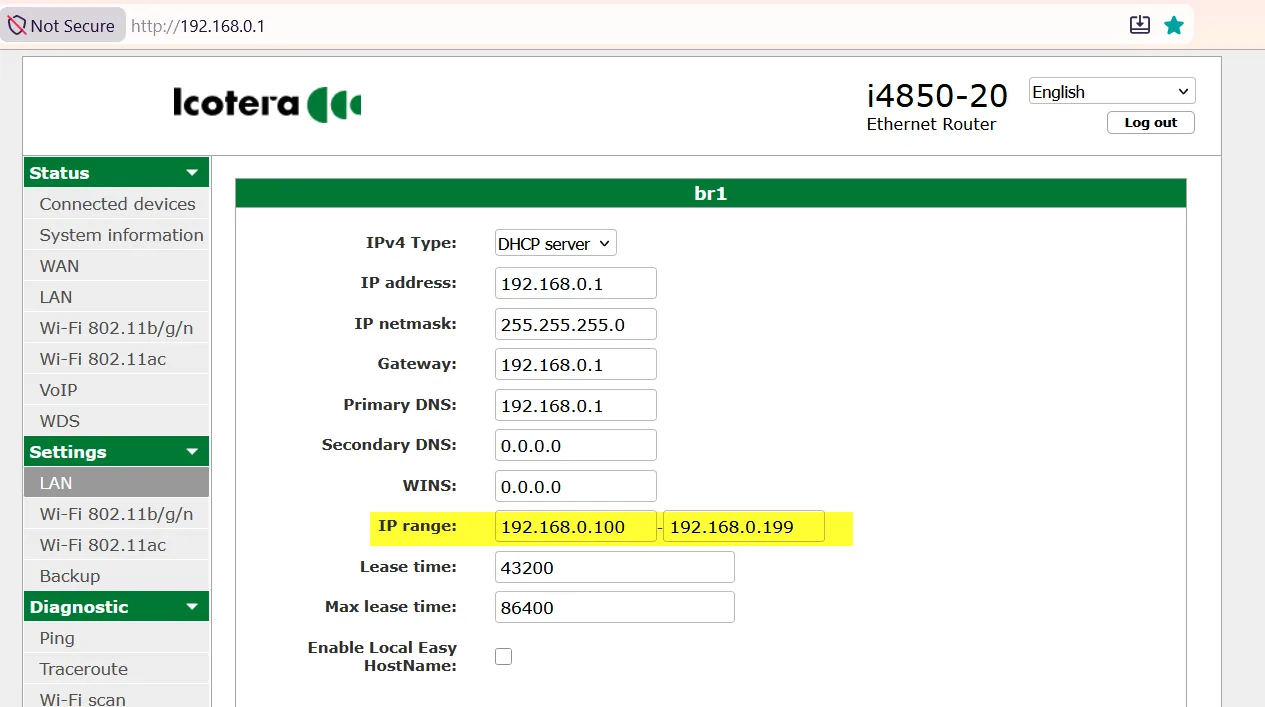
Kubernetes nodes must have stable IPs - if a node’s IP changes after reboot, the cluster loses track of it. Static IPs also make SSH and kubectl configuration predictable.
Find your gateway and connection name:
ip route
# default via 192.168.0.1 dev eth0 proto dhcp src 192.168.0.134 metric 100

nmcli connection show
# NAME                UUID   TYPE      DEVICE
# Wired connection 1  ...    ethernet  eth0
Assign a static IP (adjust address per node: .51, .52, .53):
sudo nmcli connection modify "Wired connection 1" \
  ipv4.addresses 192.168.0.51/24 \
  ipv4.gateway   192.168.0.1 \
  ipv4.dns       "192.168.0.1 1.1.1.1 8.8.8.8" \
  ipv4.method    manual

sudo reboot
Router IP range reference:
4. Prepare Each Node
Repeat the following steps on every node.
Enable cgroup memory
K3s uses cgroups to enforce CPU and memory limits on containers. Without this flag, the kernel does not expose memory accounting and K3s will fail to start or will ignore resource limits. Add to the end of the single line in /boot/firmware/cmdline.txt:
sudo nano /boot/firmware/cmdline.txt
# append below line without '#' (do not add a new line):
# cgroup_memory=1 cgroup_enable=memory
Verify after reboot:
sudo reboot
grep cgroup /proc/filesystems
# nodev   cgroup
# nodev   cgroup2
Disable swap
Kubernetes assumes it has full control over memory. Swap lets the OS silently move memory to disk, which breaks the scheduler’s resource accounting and causes unpredictable pod behavior.
sudo systemctl disable --now dphys-swapfile
sudo apt remove -y dphys-swapfile
sudo swapoff -a
sudo reboot
Confirm swap is gone:
free -h
# Swap:          0B       0B       0B
Install iptables
K3s uses iptables to manage pod-to-pod networking and service routing. The iptables-persistent package ensures rules survive a reboot.
sudo apt install -y iptables iptables-persistent
iptables --version
5. Install K3s - Control Plane
K3s is a lightweight Kubernetes distribution built for ARM and edge hardware. The control plane runs the API server, scheduler, and controller - all other nodes register against it.
Run on pi01 only:
curl -sfL https://get.k3s.io | sh -
Verify:
sudo systemctl status k3s
sudo k3s kubectl get nodes
sudo k3s kubectl get pods -A
Get the node token (needed for worker nodes):
sudo cat /var/lib/rancher/k3s/server/node-token
6. Join Worker Nodes
Worker nodes run your actual workloads. The token proves to the control plane that the joining node is authorized - without it, any machine could join your cluster.
Run on each worker node (pi02, pi03, …):
export K3S_URL="https://192.168.0.50:6443"    # control-plane static IP
export K3S_TOKEN="<paste-token-from-above>"

curl -sfL https://get.k3s.io | K3S_URL=$K3S_URL K3S_TOKEN=$K3S_TOKEN sh -
Verify the agent is running:
sudo systemctl status k3s-agent
sudo journalctl -u k3s-agent -f
Check all nodes from the control plane:
sudo k3s kubectl get nodes -o wide
# NAME   STATUS   ROLES                  AGE   VERSION
# pi01   Ready    control-plane,master   5m    v1.32.x
# pi02   Ready    <none>                 2m    v1.32.x
# pi03   Ready    <none>                 2m    v1.32.x
7. Configure kubectl
Add a permanent alias and kubeconfig in ~/.bashrc:
export KUBECONFIG=~/.kube/pi-cluster.yaml
alias k=kubectl
8. Connect to the Kubernetes Cluster from Your Windows Laptop
So far, we have been running all kubectl commands directly on the Raspberry Pi (control plane).
In this section, we’ll configure our Windows laptop so we can manage the Kubernetes cluster remotely.
Step 1: Download kubectl
Go to the Kubernetes download page:
https://kubernetes.io/releases/download/#binaries
Download the Windows kubectl.exe binary.
Note:
kubectlis just a single executable file. There is no installer.
Move kubectl.exe to a folder of your choice. For example:
C:\Tools\kubectl\
Add that folder to your Windows PATH environment variable.
Open a new Command Prompt and verify the installation:
kubectl version --client
Example:
C:\> kubectl version --client
Client Version: v1.36.2
Kustomize Version: v5.8.1

C:\>
Step 2: Create the kubeconfig Directory
kubectl looks for its configuration file in the .kube directory inside your home folder.
Open Command Prompt:
cd %USERPROFILE%
mkdir .kube
cd .kube
You should now be in:
C:\Users\<your-username>\.kube
Step 3: Copy the K3s Configuration File
The Kubernetes configuration file is located on the control plane node:
/etc/rancher/k3s/k3s.yaml
This file is owned by root, so it cannot be copied directly.
SSH into your control plane node (pi01) and run:
sudo cat /etc/rancher/k3s/k3s.yaml > ~/k3s.yaml
This creates a copy in your home directory:
/home/pi/k3s.yaml
Now use WinSCP (or scp) to copy the file to your laptop:
C:\Users\<your-username>\.kube\config
Note: Save the file with the name
config(without any file extension).
Step 4: Update the Server Address
Open the config file in Notepad.
Find this line:
server: https://127.0.0.1:6443
Replace it with the IP address of your control plane node.
For example:
server: https://192.168.0.50:6443
Why?
127.0.0.1means localhost, which only works on the Raspberry Pi itself.- Your laptop needs to connect to the Raspberry Pi over your home network.
Step 5: Verify the Configuration
Display the current Kubernetes configuration:
kubectl config view
If everything is configured correctly, you should see your cluster information.
Now verify that your laptop can communicate with the cluster:
kubectl get nodes
Example output:
NAME    STATUS   ROLES                  AGE   VERSION
pi01    Ready    control-plane,master   2d    v1.35.5+k3s1
pi02    Ready    <none>                 2d    v1.35.5+k3s1
pi03    Ready    <none>                 2d    v1.35.5+k3s1
You can now manage your Kubernetes cluster directly from your Windows laptop.
Useful Commands
Quick reference for day-to-day cluster management.
kubectl get nodes -o wide               # cluster overview
kubectl get pods -A                     # all pods across namespaces
kubectl top pod                         # resource usage (needs metrics-server)
kubectl config set-context --current --namespace=my-ns   # switch namespace
kubectl apply -f manifest.yaml
kubectl delete -f manifest.yaml
Uninstall K3s
K3s ships its own uninstall scripts that cleanly remove all binaries, services, and network interfaces it created.
# control plane
/usr/local/bin/k3s-uninstall.sh

# worker nodes
/usr/local/bin/k3s-agent-uninstall.sh